Before we through how to add beneficiary in SBI YONO app, we should know about SBI YONO app , how it can be useful for SBI customers, what are the facilities it is providing in money transactions for customers.
YONO is SBI’s mobile application which provides banking services at the customers finger tip. It also has a very simple user interface which enables customers to easily access the facilities provided by the app.
The important feature of adding the beneficiary to the SBI YONO app permanently in online banking transactions and it allows money transfers to the beneficiary without any delay.
This blog post discusses how to add beneficiaries in SBI YONO app in simple steps.
Table of Contents
How To Add Beneficiary in SBI YONO App
Nowadays all the banks have developed their mobile applications and released to their customers to do banking without physically going to banks. SBI had also introduced its mobile app called YONO.
SBI YONO app also provides features to make hotel bookings, online shopping, paying utility bills and many more coming up and they are continuously making the app more competitive in the market.
Adding a beneficiary in the SBI YONO app is an easy process and one can easily understand the process by looking at the simple user interface. For each step images are added to make understand to the normal users.
Step1 : Login To SBI YONO application

Launch your SBI YONO app in your smartphone and login to your account by entering 6 digit MPIN or providing username and password in the application.
Step 2 : Landing on Home screen to access features

You will be landed on YONO SBI home page with different clickable sections in multiple rows. Tap On Yono Pay.
Step 3 : Click on Bank account

Now Tap on Bank account to add beneficiary
Step 4: Go to pay a new Beneficiary

You can see two sections in the next screen (with head line Yono Pay – Bank Account)
Other Accounts (Other added beneficiaries)
Own Accounts (Other SBI accounts)
Click on Pay a new Beneficiary from the bottom of this page.
Step 5: Enter the profile password

In the next screen, enter the Internet banking profile password.
Step 6: Choose Beneficiary Bank
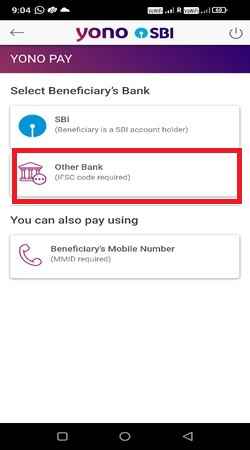
You will be landed on select Beneficiary ‘s bank screen. There will be three options
1. SBI (Beneficiary is a SBI account holder)
2. Other Bank (IFSC code required)
3. Beneficiary’s Mobile Number
Select SBI option.
Step 7: Enter mandatory beneficiary information

If you select SBI account , then you have to enter below mandatory fields
Name,
Account Number,
Re-enter Account Number,
Maximum Limit,
Nickname
Then click on Next button
Step 8 : Enter the amount

On the next page you will see your bank account number and your available balance. In the Amount field, you have to enter the amount which you want to transfer to your beneficiary.
On the same page you have to enter the purpose. If the purpose is others then you have to enter a mandatory remarks field. Then click on the pay below option.
Step 9 : Check the confirm alert message

If a beneficiary already exists, you will get an alert message saying that the beneficiary account number already exists in your beneficiary list. If you don’t see any other errors , then you can click on the confirm button.
Step 10 : Enter OTP

Now you will receive a OTP on your registered mobile number, which you have to enter then click on confirm, after confirming then click on Next
Step 11: View newly added Beneficiary
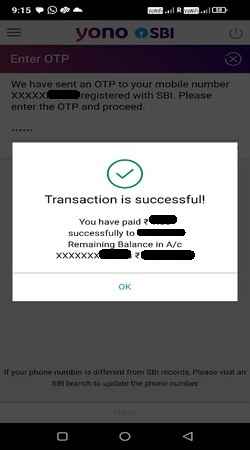
Transaction is successful confirmation will come on your phone. Once you confirm, you will be taken to another accounts option where you can see the latest beneficiary.
How to Add Beneficiaries of Different Bank Accounts in the SBI Yono App
- Step1 : Launch your SBI YONO app in your smartphone and login to your account by entering 6 digit MPIN or providing username and password in the application.
- Step 2 : You will be landed on YONO SBI home page with different clickable sections in multiple rows.
- Step 3: Tap on YONO Pay in the second row.
- Step 4: Tap on Bank account
- Step 5: You can see 2 sections in the next screen (with head line Yono Pay – Bank Account)
1. Other Accounts (Other added beneficiaries)
2. Own Accounts (Other SBI accounts)
3. Click on Pay a new Beneficiary from the bottom of this page. - Step 6: In the next screen, enter the Internet banking profile password.
- Step 7: You will be landed on select Beneficiary ‘s bank screen
1. SBI (Beneficiary is a SBI account holder)
2. Other Bank (IFSC code required)
3. Beneficiary’s Mobile Number
4. Select Other bank options, if you want to add beneficiaries other than sbi. - Step 8: If you select Other Bank Account, enter below mandatory fields
1. Name,
2. Account Number,
3. Re-enter Account Number,
4. IFSC code,
5. Maximum Limit,
6. Nickname
When you enter IFSC code, the associated bank details will be displayed automatically.
Then click on the Next button. - Step 9: On the next page you will see your bank account number and your available balance. In the Amount field, you have to enter the amount which you want to transfer to your beneficiary.
- On the same page you have to enter the purpose. If the purpose is others then you have to enter a mandatory remarks field. Then click on the pay below option.
- Step 10 : If a beneficiary already exists, you will get an alert message saying that the beneficiary account number already exists in your beneficiary list. If you don’t see any other errors , then you can click on the confirm button.
- Step 11: Now you will receive a OTP on your registered mobile number, which you have to enter then click on confirm, after confirming then click on Next
- Step 12: Transaction is successful confirmation will come on your phone. Once you confirm, you will be taken to another accounts option where you can see the latest beneficiary.
How To Edit or Delete Beneficiary in SBI YONO App
Till now we this article explains the steps on how to add beneficiary in SBI YONO app, now the below steps explains how to delete or modify the existing beneficiaries.
- Step 1: Launch your SBI YONO app on your smartphone.
- Step 2: Now click on YONO Pay from the home screen.
- Step 3: Select Bank Account option.
- Step 4: You will see, Other Accounts option in the next page, Tap on Other Accounts button.
- Step 5: A list of all the beneficiaries which you have added previously will appear in front of you. Here you can edit or delete the list of beneficiaries. The beneficiaries may be edited by selecting edit option and which can be deleted by delete option.
Here the important point to remember is you can only change the nickname of your account , you can not change account name and account number.
The Value of Adding Beneficiaries to the SBI Yono App
It is essential to add beneficiaries to the SBI YONO (You Only Need One) app for a number of reasons.
Fund Transfers: Users of SBI YONO can move money between their accounts and those of other banks and other SBI branches. By adding beneficiaries, users can send money securely and swiftly without constantly entering the recipient’s information.
Easy access: When completing repeated transactions, users can save time and effort by adding beneficiaries. Beneficiaries’ information is safely saved in the app after it is added, facilitating more seamless and effective transactions in the future.
Security: SBI YONO places a high priority on protecting user transactions. By adding beneficiaries, you can make sure that money is moved to only approved accounts. During the addition process, users have the option to confirm beneficiary details, which lowers the possibility of mistakes or fraudulent transactions.
Recurring Payments: For example, utility bills, loan EMIs, or salary, users frequently have to make recurring payments to the same recipients. By adding beneficiaries, users may effortlessly plan for recurrent payments, guaranteeing timely transactions without requiring manual intervention each time.
Family and Business Transactions: Users are able to add beneficiaries for transactions pertaining to their personal and professional lives. For business owners who frequently need to send money to suppliers, vendors, or staff, this tool is quite helpful.
Emergencies: Having pre-added beneficiaries might be quite helpful in an emergency. Users can send money to trustworthy family members or friends instantly, making sure that their immediate financial needs are satisfied.
Peace of Mind: Users can feel at ease knowing that beneficiaries are pre-added in the SBI YONO app. They may relax knowing that all of their financial activities are handled effectively and that money can be moved to the right people at the right time.
FAQ of How To Add Beneficiary in SBI YONO App:
Q: How long does it take for beneficiary activation in Yono SBI?
A: Within 4 hours the beneficiary can be activated. Only one beneficiary can be added or approved within one calendar day.
Q: Could I Send Money Right Away After Adding The Recipient To SBI Yono?
A: No, after adding the beneficiary, you cannot start transferring money right away. Only after the beneficiary has been verified in the system, you can send money. You can transfer up to Rs 5,000,00 in the first four days if it is authorized. The set sum can be transferred to the beneficiary following the conclusion of the four-day “cooling off” period.
Q: How Much Can Be Transferred In SBI Yono To A New Beneficiary During The Cooling Off Period?
A: You can transfer up to Rs 5,000,000 to a new beneficiary in SBI YONO during the cooling-off period. Nevertheless, this is only possible if the system has activated it.
Q: Can I Create Two SBI Yono Accounts?
A: You need to provide your phone number and login information in order to register on the YONO app. In YONO, you can only manage a single account with a single login.
Q: Can I add beneficiaries from other banks to the YONO app?
A: In the YONO app, you can add beneficiaries from other banks, yes.
Q: Can I Add How Many Beneficiaries?
A: You have total control over how many beneficiaries you choose to add. In the SBI and Other Bank categories, you are limited to adding three beneficiaries every day.
Q: Could I Change the Added Beneficiary?
A: Yes, You can change the additional beneficiary.
Q: What Is The SBI Yono Cooling Off Period For A New Beneficiary?
A: The cooling down period for a new beneficiary you add to your YONO app is four days.
Q: What is the cooling period for newly added beneficiary in SBI?
A: 4 days. The signed form needs to be submitted to the branch to activate the beneficiary. Immediate beneficiary activation will be done. Instant 4 days cooling period will not be applied.
Q: What is the transaction limit for newly added beneficiary within 24 hours?
A: 50,000 rupees can be transferred by IMPS in the first 24 hours.
Q: What is the limit for quick transfer in SBI?
A: 50,000 per transaction and per day.
Q: What is the difference between YONO SBI app and YONO Lite?
A: Yono SBI app is a complete application with various features and YONO Lite is developed to provide minimum features to support money transfers.
Wrap up of How To Add Beneficiary in SBI YONO App
In conclusion, adding beneficiaries to the SBI YONO app improves users’ transactional convenience, security, and efficiency, making it a crucial feature for successfully managing a range of financial activities. Adding beneficiaries before transferring the money gives peace of mind and avoids the repeated task of entering account number and IFSC.
Read More: Pi Cryptocurrency Value Prediction